# 代码链接
演示视频
有兴趣把源码下载下来,去playground (opens new window)目录运行一下。
# 需求背景
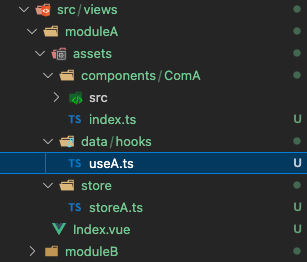
现有的目录规范如下
assets 文件夹,可以是针对大模块、某个端的公共资源;也可以是当前单一功能(如果你觉得有必要)的资源
├── assets
│   ├── components # 组件文件夹
│   │   ├── ComA
│   │   │   ├── src # 组件所有核心内容
│   │   │   ├── index.ts # 本组件出口文件 使用组件的时候是引用该文件
│   ├── data
│   │   ├── api # 当前模块涉及到的接口
│   │   │   ├── apiA.ts
│   │   ├── hooks # 钩子
│   │   │   ├── useA.ts
│   │   ├── types # ts类型
│   ├── img # 图片资源
│   ├── store
│   │   ├── storeA.ts
大概会是这个样子

这样的目录用起来挺清晰的,但同时带来一个痛点是层级太深了,这主要是体现在页面引用,编写路径的时候,增加了开发的心智负担。
# 工具实现
# 头脑风暴
重申一下,我们的痛点和工具的目的是解决引用的路径问题,基于上面的目录,我们在使用时是这样的
并且页面中有一大堆的
import
import { WeeksResult } from "../assets/components/CalendarCustom/src/api";
import { useCardList } from "./assets/data/hooks/useCard";
那能有什么方式解决这个问题呢,正当我一筹莫展的时候
![[灵光一现]](https://lf3-cdn-tos.bytescm.com/obj/static/xitu_juejin_web/img/jj_emoji_25.51e6984.png)
忽然想到vue源码中shared (opens new window),虽然他的原意是一个工具包,但是我们可以借鉴这个思路——统一出入口
因为我们是业务开发,并不是utils,所以更合适的做法是在每个assets文件夹下都写一个出口文件shared.ts,看到这里你会想说,这不就是平时的index.ts的出口吗,和shared有什么关系
但我确实是受到shared (opens new window)的启发的 😅,同时还做了一些改动
// @vue/shared
export * from "./patchFlags";
export * from "./shapeFlags";
export * from "./slotFlags";
上面的用法用在业务开发中存在一个问题,就是导出成员的重复命名。所以呢,我最终是以文件名命名,会是这样
// shared.ts
import * as CountCardIndex from "./components/CountCard/index";
import * as TimeLineIndex from "./components/TimeLine/index";
import * as dataApi from "./data/api";

export { CountCardIndex, TimeLineIndex, dataApi };
避免了文件内部导出的成员(变量、函数)名重复的问题
有了方案后,就是代码书写的问题了,乍一看就是把assets下的ts全都引进来了并导出,这种单一且枯燥开发人员去写肯定是不太合适的;就像接口api一样,现在很多工具都可以自动生成了,比如apiFox
理所当然,我们的shared也应该自动生成
# 代码实现
需要特别注意
Windows和Mac的差异性。
- 文件路径
Windows是\,而Mac是/,使用path做兼容node_modules的执行文件类型不一致
# 全局变量
import ChildProcess from "node:child_process";
import chalk from "chalk";
import fs from "node:fs";
import os from "node:os";
import Path from "node:path";
const sep = Path.sep;
/** 最终生成的shared.ts文件集合 */
const sharedList = new Set();
# 1.找到views文件夹下所有的assets文件夹路径
递归遍历传入的路径,找到所有 assets 文件夹的路径并返回
这里的代码比较简单,先拿到目录下的子目录,判断名字是否为assets;是则记录起来,否则递归
/**
 * @author: gauharchan
 * @description 递归遍历传入的路径,找到所有assets文件夹的路径
 * @param {string} path 默认是遍历views
 */
export function getAssetsSet(
  path = Path.resolve(dirName, 'src/views'),
  pathSet = new Set<string>()
): Set<string> {
  const dirArr = fs.readdirSync(path);
  dirArr.forEach((dir) => {
    const isDirectory = fs.lstatSync(`${path}/${dir}`).isDirectory();
    if (isDirectory) {
      if (dir === 'assets') {
        pathSet.add(Path.resolve(path, 'assets'));
      } else {
        // 如果是其他文件夹,递归遍历
        getAssetsSet(`${path}/${dir}`, pathSet);
      }
    }
  });
  return pathSet;
}
# 2.通过assets路径遍历查找该目录相关的ts文件路径
拆解一下
- 遍历传入的子目录,并获取文件信息
- 如果是文件夹
- 组件文件夹 直接取 compoents/${dir}/index.ts。因为组件文件夹的规范,都会有一个
src文件夹和index.ts出口 - 其他文件夹继续递归,找到其所有的 ts 文件为止
- 组件文件夹 直接取 compoents/${dir}/index.ts。因为组件文件夹的规范,都会有一个
- 如果是 ts 文件,直接记录
/**
 * @author: gauharchan
 * @description 获取assets目录下所有的ts文件
 * @param {string} parentPath 当前文件夹路径
 * @param {string[]} childDirs 当前文件夹下的子目录、子文件
 * @param {Set} pathSet ts文件集合
 * @returns {Set} pathSet ts文件集合
 */
function recursion(
  parentPath: string,
  childDirs: string[],
  pathSet = new Set<AssetsFile>()
): Set<AssetsFile> {
  childDirs.forEach((item) => {
    const stat = fs.lstatSync(Path.resolve(parentPath, item));
    // 如果是文件夹
    if (stat.isDirectory()) {
      // components 直接取compoents/${dir}/index.ts
      if (item.toLowerCase().includes('component')) {
        const componentPath = Path.resolve(parentPath, item);
        fs.readdirSync(componentPath)
          .filter((com) => fs.lstatSync(Path.resolve(componentPath, com)).isDirectory())
          .forEach((com) => {
            // 判断有没有index.ts文件
            if (fs.existsSync(Path.resolve(componentPath, com, 'index.ts'))) {
              pathSet.add({
                url: Path.resolve(componentPath, com, 'index.ts'),
                name: getExportName(Path.resolve(componentPath, com), 'index.ts'),
              });
            }
          });
      } else {
        const path = Path.resolve(parentPath, item);
        // 获取子目录
        const dir = fs.readdirSync(path);
        if (!dir) return;
        // 递归遍历解析文件夹
        recursion(path, dir, pathSet);
      }
    } else if (item.endsWith('.ts')) {
      // && stat.size > 0 stat.size 过滤空文件
      // ts文件,直接记录
      pathSet.add({
        url: Path.resolve(parentPath, item),
        name: getExportName(parentPath, item),
      });
    }
  });
  return pathSet;
}
/** hooksUseWeek 文件夹名+ts文件名(驼峰) */
function getExportName(parentPath: string, fileName: string) {
  /** 上层文件夹名 */
  const firstName = parentPath.split(sep).pop();
  /** 文件名,不包含文件类型后缀 */
  const lastName = fileName.split('.').shift() || '';
  const arr = lastName.split('');
  // 首字母大写
  arr[0] = arr[0].toUpperCase();
  return `${firstName}${arr.join('')}`;
}
# 3.组合ts文件路径并生成代码
生成代码就很简单了,上面我们已经获取到所有的ts 文件路径和导出的命名了;这里主要就是截取/assets后面的路径,然后拼接好模板字符串
function getContent(pathSet: Set<AssetsFile>) {
  let importArr: string[] = [];
  // 导出的变量名
  let exportArr: string[] = [];
  pathSet.forEach((item) => {
    const index = item.url.search(`${sep}assets`);
    // 解析获取/assets后面的路径 windows和mac的路径开头部分不一致,window以/开头
    const url =
      `.${item.url.startsWith("/") ? "" : "/"}` +
      item.url.substring(index + "/assets".length);
    importArr.push(
      `import * as ${item.name} from '${
        url.replaceAll("\\", "/").split(".ts")[0]
      }';\n`
    );
    exportArr.push(item.name);
  });
  const content = `${importArr.join("")}
export {
  ${exportArr.join(",\n  ")},
};
`;
  return content;
}
# 4.创建函数
/**
 * @description 根据路径遍历assets所有目录创建shared.ts
 * @param { string } targetPath 目标assets路径
 */
export function createShared(targetPath: string) {
  // assets的子目录
  const assetsModules = fs.readdirSync(targetPath);
  // 遍历获取所有ts文件
  const allTs = recursion(
    targetPath,
    assetsModules.filter((file) => !file.endsWith(".ts")) // 剔除shared.ts
  );
  // 写入代码内容
  fs.writeFileSync(`${targetPath}/shared.ts`, getContent(allTs), "utf-8");
  sharedList.add(`${targetPath}/shared.ts`);
}
# 代码优化
# Eslint 修复
上面我们实现了代码的生成,并且在getContent中的模板字符串中还特意进行了换行,增加逗号等,但是并不能确保符合项目的Eslint规则,或者说生成的代码格式并不可控
因此,我们应该在生成完文件后调用eslint进行修复;
我们实现了一个run函数,并作为最终的执行函数
- 接收路径并调用
createShared创建shared文件,同时收集好路径sharedList - 执行
eslint命令修复
/**
 * @author: gauharchan
 * @description 执行函数
 * @param {string[]} dirs 默认遍历整个views
 */
export function run(dirs: string[] | Set<string> = getAssetsSet()) {
  sharedList.clear();
  dirs.forEach((dir) => createShared(dir));
  const fileUrls = Array.from(sharedList).join(" ");
  // eslint 修复
  try {
    ChildProcess.execSync(`eslint ${fileUrls} --fix`);
    console.log(
      `${chalk.bgGreen.black(" SUCCESS ")} ${chalk.cyan(
        `生成了${sharedList.size}个文件,并已经修复好Eslint`
      )}`
    );
  } catch (error) {
    console.log(
      `${chalk.bgRed.white(" ERROR ")} ${chalk.red("eslint 修复失败")}`
    );
  }
}
# 文件监听
监听文件的新建与删除,针对该assets目录重新生成shared.ts;这里就是使用chokidar (opens new window) 进行watch,在其提供的事件执行 run 函数
- 获取到所有的
assets路径并进行监听 watcher准备好的时候就全量执行生成views下所有的assets/shared.ts- 在新增、删除的时候,只处理当前的
assets文件夹重新生成shared.ts
import { run, getAssetsSet } from "./shared";

import chalk from "chalk";
import chokidar from "chokidar";
import Path from "node:path";

/** 插件配置 */
export interface PluginOptions {
  /** 是否展示对已删除文件引用的文件列表 */
  showDeleted?: boolean;
  /** 页面文件夹路径,一般是src/views、src/pages */
  source?: string;
}

let watcher: chokidar.FSWatcher | null = null;
let ready = false;
const sep = Path.sep;

/**
 * @author: gauharchan
 * @description 监听文件改动
 * @param { Object } options 配置
 * @param { boolean } options.showDeleted 是否展示对已删除文件引用的文件列表
 */
export function watch(options?: PluginOptions) {
  // 文件新增时
  function addFileListener(path: string) {
    // 过滤copy文件
    if (path.includes("copy")) return;
    if (ready) {
      parseAndCreate(path);
    }
  }
  // 删除文件时,需要把文件里所有的用例删掉
  function fileRemovedListener(path: string) {
    parseAndCreate(path);
    options?.showDeleted && findImportFile(path);
  }
  if (!watcher) {
    // 监听assets文件夹
    watcher = chokidar.watch(Array.from(getAssetsSet(options?.source)));
  }
  watcher
    .on("add", addFileListener)
    // .on('addDir', addDirecotryListener)
    // .on('change', fileChangeListener)
    .on("unlink", fileRemovedListener)
    // .on('unlinkDir', directoryRemovedListener)
    .on("error", function (error) {
      console.log();
      console.log(
        `${chalk.bgRed.white(" ERROR ")} ${chalk.red(
          `Error happened ${error}`
        )}`
      );
    })
    .on("ready", function () {
      console.log();
      console.log(
        `${chalk.bgGreen.black(" shared ")} ${chalk.cyan("检测assets文件夹中")}`
      );
      // 全量生成一遍shared文件
      run(getAssetsSet(options?.source));
      ready = true;
    });
}
/**
 * @author: gauharchan
 * @description 解析目标路径,只更新目标路径的shared.ts
 * @param {string} path 新增、删除的文件路径
 */
function parseAndCreate(path: string) {
  // 只监听ts文件(不管图片)  排除shared.ts(否则自动生成后会再次触发add hook) 组件只关心components/xx/index.ts
  const winMatch = /assets\\component(s)?\\[a-zA-Z]*\\index.ts/g;
  const unixMatch = /assets\/component(s)?\/[a-zA-Z]*\/index.ts/g;
  const componentMatch = sep == "/" ? unixMatch : winMatch; // match不到是null
  if (
    (path.endsWith(".ts") && !path.endsWith("shared.ts")) ||
    path.match(componentMatch)
  ) {
    // 找到当前的assets目录
    const assetsParent = path.match(/.*assets/)?.[0];
    assetsParent && run([assetsParent]);
  }
}

/**
 * @author: gauharchan
 * @description 找到对 当前删除(重命名)的文件 有引用的所有文件
 * @param {string} path 当前删除(重命名)的文件路径
 */
function findImportFile(_path: string) {}
# vite 插件
运行上面的代码,一般来说我们是起一个新的终端,再运行node命令,或者在package.json的script中新加一个命令
但其实基于以往的经验,这种工具类的东西只要是多一个额外的操作步骤,我们傲娇的开发者就不会去使用的;还是 根据api文档生成api.ts的例子,原本我们也有这么一个工具,但是每个项目的 api 文档地址肯定是不一样的嘛,因为需要开发者配置一下,还有一些其他的灵活配置,从工具的角度出发没有任何的毛病,但是作为使用者,居然没有人愿意去做、去用;宁愿自己手动去写这些无聊、重复性的代码。
因为我这次吸取教训,以vite插件的方式运行,也就是说启动serve服务的时候执行
// vite-plugin-shared.ts
import { Plugin } from "vite";
import { PluginOptions, watch } from "./watch";

export function vitePluginShared(options?: PluginOptions): Plugin {
  return {
    name: "vite-plugin-shared",
    buildStart() {
      watch(options);
    },
    apply: "serve",
  };
}

export default {
  vitePluginShared,
};
接下来只需要在vite.config.ts中引入使用即可
// ...
import { vitePluginShared } from 'vite-plugin-shared';
export default defineConfig(({ mode }) => ({
  base: '',
  plugins: [
    vue(),
    Components({
      resolvers: [VantResolver()],
    }),
    vitePluginShared({...}),
  ],
  // ...
 }));
现在我们的shared工具就会在正常启动项目的时候运行啦,没有配置的心智负担了
# 插件配置参数
| 参数名 | 描述 | 类型 |
|---|---|---|
| source | 页面文件夹路径,一般是 src/views、src/pages | string[可选] |
| showDeleted | 是否展示对已删除文件引用的文件列表 | boolean[可选] |
# 发包注意事项
- 发包后
__dirname指向的是node_modules/xxx/vite-plugin-shared/dist;因此代码中使用process.cwd()获取终端运行路径,因为我们是在起serve的时候运行 chalk依赖的问题- 直接使用
node的chalk,会存在相关方法不存在的情况 - 使用
pnpm安装,要注意版本,因为chalk5.x开始是ESM,推荐使用4.1.2
- 直接使用
- 每次发包要修改
version
# future feature
[x] 建立
Monorepo规范的仓库,最终集合在私服来解决更新的问题我们目前这个代码是放在了项目的根目录中(因为还在
beta阶段),因此后续工具代码更新成为了一个大问题[ ] 自己实现文件监听系统的重命名事件,并实现对文件中的引用命名自动修改(类似 volar 插件的功能)

目前有个痛点是,我们抛出的成员名称是以文件夹+文件名命名的,assets原有的ts文件一旦重命名,那么成员的名称将会变更,同时页面中的引用需要我们手动更改
chokidar没有提供重命名的事件监听
Taro3.x →
